 09-08-2009, 05:30 PM
|
#9
|
|
3" Exhaust
Join Date: Aug 2009
Location: Southern Oregon Coast
Posts: 83
|
 7MGE Rebuild - back in the again
Picked up clutch. $200 for pressure plate, disk, throw out bearing, pilot bearing, and alignment tool. Had the old flywheel resurfaced by the shop.
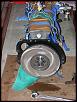 Forgot to pull out old pilot bearing on the crank before the shop work was done so I had to pull it myself but did not have a tool. Remembered an old technique for years past packed the pilot hole with grease and used a 3/8 socket extension and hammered into hole. The hydraulic pressure of the grease from behind pushed out the bearing. Took 4 hits with grease repack but it came out pretty smooth. Put new bearing in with a ? socket just tapping on the edge of the bearing.
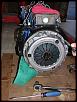 Mounted the new clutch and aligned the disk with the tool. The book says to torque the clutch pressure plate to 15 pounds but that seemed kind of low. I thread sealed the flywheel and clutch bolts anyway.
Now it was time to chain up the block and lift it back into the car. I am dong the block with out the head because its easier to move around and get in a do the bell housing bolts without the head on. I was concerned about alignment with the transmission shaft as it seemed real easy to snap it off if things were not aligned right when lifting the block back in.
Mounted the new clutch and aligned the disk with the tool. The book says to torque the clutch pressure plate to 15 pounds but that seemed kind of low. I thread sealed the flywheel and clutch bolts anyway.
Now it was time to chain up the block and lift it back into the car. I am dong the block with out the head because its easier to move around and get in a do the bell housing bolts without the head on. I was concerned about alignment with the transmission shaft as it seemed real easy to snap it off if things were not aligned right when lifting the block back in.
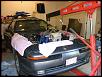 Now a few things I learned. First, put the two top bell housing bolts in before doing anything. I found it impossible to get them in after the transmission was jacked up to the firewall which you need to do to get the right angle to join with the block. Second, jack up the transmission all the way to the firewall to get a better angle. When you lift the block in, the front of the engine is about 30 degrees up from the rear so the oil pan can clear the lower support beams. Here is the important part unbolt the clutch slave cylinder from the bell housing so the clutch fork is able to completely retract. It took me almost 2 hours in trying to match the block and transmission and not getting them together until I realized the clutch fork/throwout bearing was trying to engage the pressure plate that no mere human can push against. Disconnecting the slave cylinder allowed the clutch to slide in over the shaft with no pressure SIMPLE.
 When I removed the engine, I unbolted the two support mounts from the block and not the frame it was just easier due the angle of the frame bolts. On reassembly I bolted the transmission on before attaching the engine mounts bad idea. It is impossible to put the mounts back on after the engine is set in unless you undo the frame bolts from below which I was trying to avoid in order to not mess with the alignment. In hind sight I should have placed the engine mounts on the frame before lifting in the engine. Oh well it only took another half hour under the vehicle to fix this.
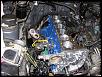 A side note After the block was in and the engine mounts tightened (total of 4 hours) I put a socket on the crank shaft and turned the engine to see if there was no binding and that the transmission and clutch were all still working After a few cranks I heard a loud POP! OH NO! sounded like I had just snapped something off. Im thinking something in the transmission?, Crank?, Piston? Anyway, just like anyone else, since I cant figure out what it was I just do it again! A few more cranks and again the loud POP. This time I notice the protective covering I had on the block deck to keep it clean was pushing out like a big balloon. Seems I had it strapped in tight enough that it created a seal so when the piston pushed up it blew it out with a nice pop. Good news is that the engine works!
Now I get to go under and finish bolting in the bell housing and stiffeners
A side note After the block was in and the engine mounts tightened (total of 4 hours) I put a socket on the crank shaft and turned the engine to see if there was no binding and that the transmission and clutch were all still working After a few cranks I heard a loud POP! OH NO! sounded like I had just snapped something off. Im thinking something in the transmission?, Crank?, Piston? Anyway, just like anyone else, since I cant figure out what it was I just do it again! A few more cranks and again the loud POP. This time I notice the protective covering I had on the block deck to keep it clean was pushing out like a big balloon. Seems I had it strapped in tight enough that it created a seal so when the piston pushed up it blew it out with a nice pop. Good news is that the engine works!
Now I get to go under and finish bolting in the bell housing and stiffeners
|

|

|